Installation
Steps overview
The instructions in this article have been tested on Ubuntu 20.04.
You should be able to run an install.sh script and that will install the following dependencies:
 |  |  |
|---|
Caddy HTTP server
The purpose of the server is to be the public facing element of the entire system. Caddy is at the moment the preferred option due to its small size, single-binary option and compact configuration files.
sudo apt install -y debian-keyring debian-archive-keyring apt-transport-https curl

curl -1sLf 'https://dl.cloudsmith.io/public/caddy/stable/gpg.key' | sudo gpg --dearmor -o /usr/share/keyrings/caddy-stable-archive-keyring.gpg
curl -1sLf 'https://dl.cloudsmith.io/public/caddy/stable/debian.deb.txt' | sudo tee /etc/apt/sources.list.d/caddy-stable.list

sudo apt update
sudo apt install caddy
CouchDB
The sleek and performant NoSQL database does all the heavy lifting in terms of processing data. More installation instructions are on the official documentation page
sudo apt install -y curl apt-transport-https gnupg

curl https://couchdb.apache.org/repo/keys.asc | gpg --dearmor | sudo tee /usr/share/keyrings/couchdb-archive-keyring.gpg >/dev/null 2>&1 source /etc/os-release

echo "deb [signed-by=/usr/share/keyrings/couchdb-archive-keyring.gpg] https://apache.jfrog.io/artifactory/couchdb-deb/ focal main" | sudo tee /etc/apt/sources.list.d/couchdb.list >/dev/null

sudo apt update
sudo apt install -y couchdb
Select standalone configuration in the next step, then press Tab, followed by Enter
to proceed.
For the next step, you need to setup a "magic cookie" for syncronizing nodes within a cluster. If you don't plan to use that functionality, just type in something and press Enter.
Leave the value of the bind-address to 127.0.0.1 to keep the network access to local
only. Specific access will be granted through the caddy http proxy.
Then, type in a password for the admin user. This is the main super-user account in the system. Other "admin" accounts can be added later as well.
NodeJS
The choice was made for NodeJS as the server-side tool in order to have javascript running across the full stack. Other options for doing server task handling can be used instead.
curl -o- https://raw.githubusercontent.com/nvm-sh/nvm/v0.39.3/install.sh | bash

export NVM_DIR="$([ -z "${XDG_CONFIG_HOME-}" ] && printf %s "${HOME}/.nvm" || printf %s "${XDG_CONFIG_HOME}/nvm")"
[ -s "$NVM_DIR/nvm.sh" ] && \. "$NVM_DIR/nvm.sh" # This loads nvm

# Install current LTS version
nvm install 18
Currently in use is the nvm version manager a LTS version > 16.
Tor
Tor is needed for privately connecting to the LND instance on the computer running the bitcoin full node. Be careful as some hosting providers might give you a hard time if they see you running the Tor service.
sudo apt install -y tor
Main application deploy
Clone the repository with
git clone https://git.radustanciu.ro/radu/zap_backend_beta.git
Install npm dependencies with
cd zap_backend_beta

npm install
Setup env file
The .env file in the root of the application folder contains critical settings
related to the operation of the entire system.
A sample file is shipped with each installation at .env.example and contains
the following settings.
# Copy this file to .env and fill in the variables with your values.

# Port on which hapi server is running
# will be forwarded to from the caddy public interface
SERVER_PORT=9994

# Hapi plugins to load for business logic
PLUGINS=ln_invoice,email

# Root couchdb API access url
COUCH=http://localhost:5984

# Couch database handling all store-related data
DB_NAME=zap

# Admin basic authentication token for CouchDB instance
COUCH_PASS=cmFkdTpzaXJpdXM=

# Document where near-live exchange rates are kept
# should be constantly updated by a cron job
RATES_DOC=rate:10kSATS

# Reference to main settings document shared by the platform
SETTINGS_DOC=settings
SERVER_PORT
Port on which the NodeJS/Hapi server is running for API access.
COUCH
Root host for CouchDB instance. It's usually http://localhost:5984 when running on the
local machine, but it can be setup to use an external instance as well.
COUCH_PASS
You need the Basic Authentication header value combined from the username and password setup on the CouchDB install.
Type the following in a terminal:
echo -n 'username:password' | base64
PLUGINS
Comma separated list of files from src/plugins which are processing the order document and provide
additional data on the document before saving.
Currently, the options are:
ln_invoice- handles everything related to generating a proper LND invoiceemail- provides fields needed for the email sending service to pick up on
Lightning node settings
You need to configure the LND_ENDPOINT and LND_MAC values.
You can obtain the values from the Lightning Node application from Umbrel by clicking on the three dots from the top right corner, and copying the host and the port.
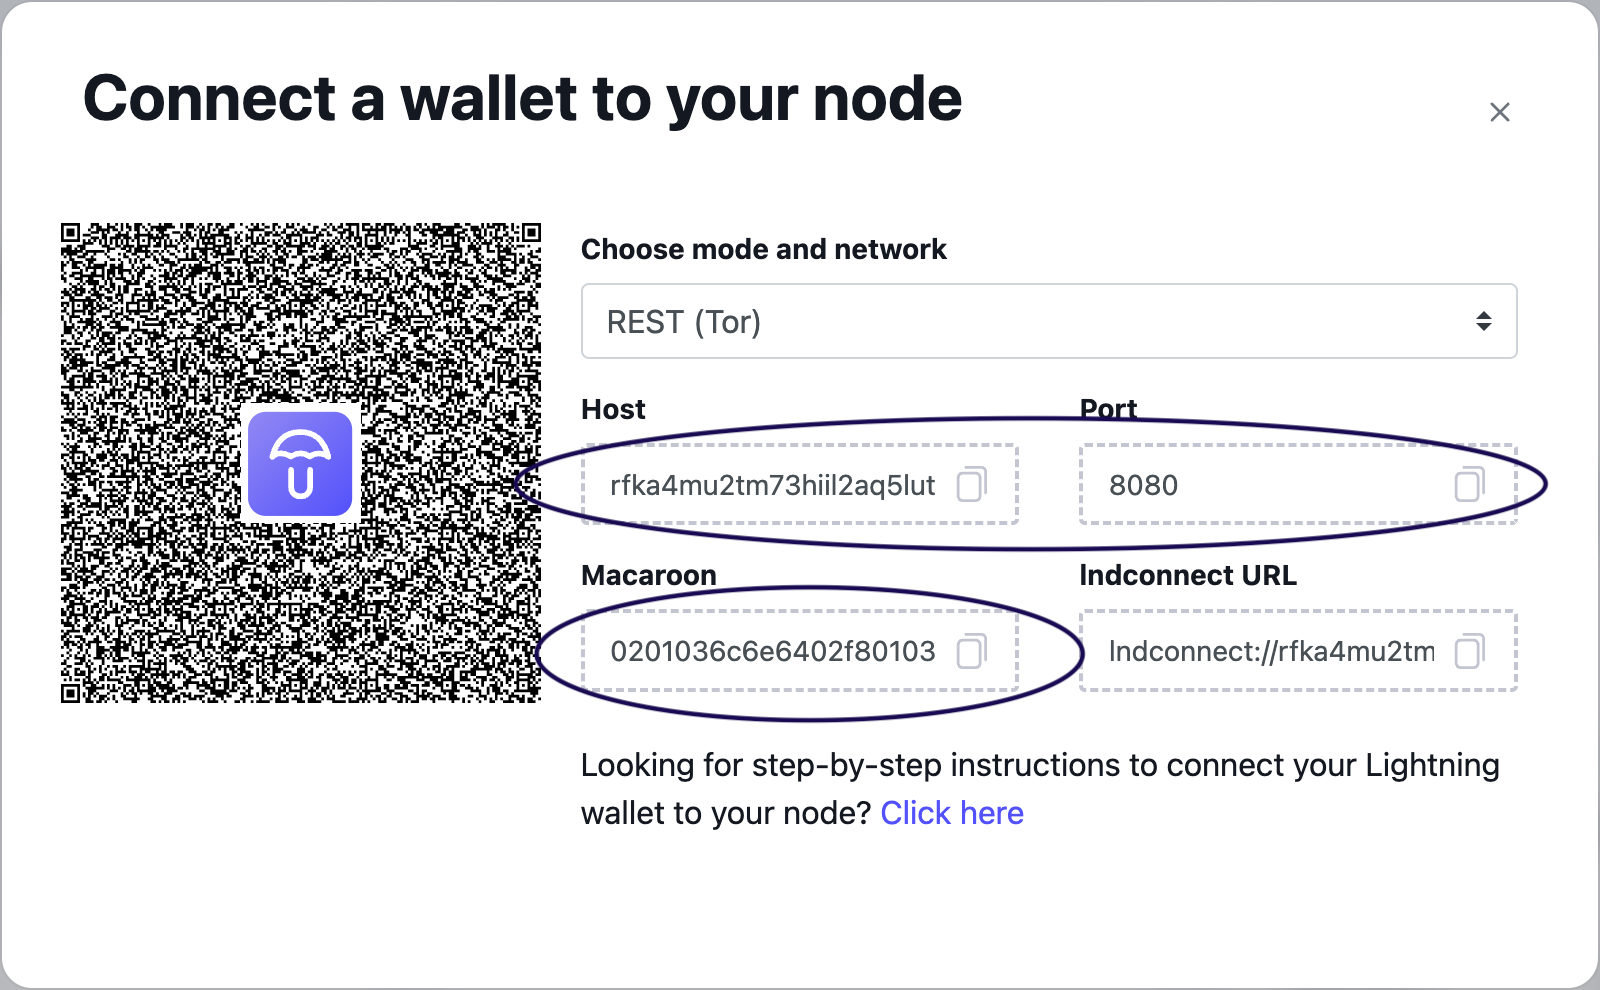
The final settings would look something like this:
LND_ENDPOINT=il2aq5lutd5gj6rj2nb75brjqqygrfka4mu2tm7kwuldid.onion:8080
Then, copy the Macaroon value to have the .env entry like:
LND_MAC=656e6572617465120472656...very_long_string
Bootstrap CouchDB database
Upload the interfaces couchapp by running the install/install_couchapps.sh script.
The scripts will use settings from the .env file so make sure you have that
configured properly.
node ../couchapps/default_docs.js
node ../couchapps/ln_invoice.js
Assign cron jobs
A cron job should be created to handle updates for the BTC price relative to fiat
currencies. The script is located under cronjobs/fetch_btc_rates.js and is currently
using the public API from coinapi.io.
The cron job can be run at any interval, however to not overload the system and stay within API rate limits, the recommended interval is 1 hour.
First, find out the current username with:
echo $USER
Then, find the exact path where the node executable is found by using:
whereis node
You can setup a cronjob with the following command:
crontab -e
Replace $USER with what's returned from the first command and the path to nodejs
with the output from the second command.
The cron line would look something like this:
* * * * * /home/$USER/.nvm/versions/node/v18.16.0/bin/node /home/$USER/zap_backend_beta/cronjobs/fetch_btc_rates.js > /home/parallels/btc_rates_output
Save the file using Ctrl+X then Enter (assuming you are using the nano editor).
You can use https://crontab-generator.org/ to easily generate a crontab line.
Setup caddy config
The Caddy config file should be located at /etc/caddy/Caddyfile. Add the config below
while reeplacing the domain and subdomain name with your own.
The 9994 port has to match the one specified in the .env file.
api.my-domain.com {
    reverse_proxy 127.0.0.1:9994 {
        header_up X-Real-IP {remote_host}
    }
}
If you want to integrate the API just behind a route on your existing website configuration, use the following config:
route /fulger/* {
    uri strip_prefix /fulger
    reverse_proxy localhost:9994
}
Start service using PM2
The following services need to be started:
- Main Hapi server
pm2 start zap_backend/dist/index.js
- Invoice processing module
pm2 start zap_backend/node_scripts/invoice_processor.js
- Invoice settlement detection
pm2 start zap_backend/node_scripts/watch_ln_payments.js
Once all processes are started, use
pm2 save
to persist the list on future reboots.